List of my modules...
Module: Convert_Scene_To_PovRay
Description:
Translates the open inventor scene shown in the main viewer (i.e. viewer 0) into a POV-Ray (Persistence Of Vision, a raytracer freeware) file.
The idea is to be able to improve on the visual quality of a scene, setup in Avizo, with the raytracing abilities of a dedicated program.
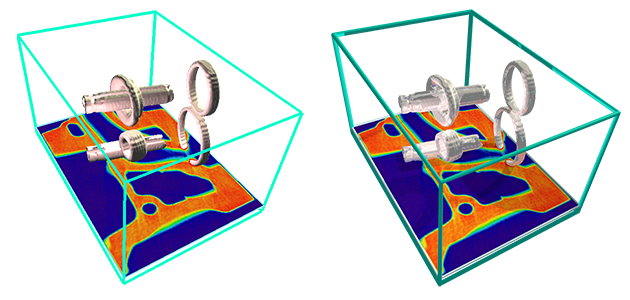
Left : scene displayed in viewer 0 of Avizo. Right : POV-Ray scene from file generated by this module (reflectiveness proving it wasn't Avizo again).
NOTES:
- This is what is converted :
- The camera (orthographic or perspective)
- Transparent or uniform background
- The lights (directional, point, and spot), including the headlight
- Cubes, spheres, cones and cylinders
- Surfaces (drawn with Isosurface or Surfaceview)
- Line sets and indexed line sets
- Face sets
- OrthoSlices
- The conversion process generates a version 3.7 POV-Ray file.
- Several files can be created: a .pov file for each frame in an animation (only one for no animation), an .inc file containing different properties and settings, and eventually png files for the orthoslices.
- The .inc file contains a lot a parameters for setting up the generic material properties, that you can tinker with.
Reproducing the material properties of the shapes in Avizo is limited, the basic idea of this module is to define the positions of the different objects in the scene (camera, lights, shapes), and handle the rest in POV-Ray.
Connections:
Ports:
Options

Some basic options.
- Background: Whether there is a background, or whether it'll be transparent (in the latter, must have +UA option in POV-Ray).
- Animate: For rendering several frames in an animation. As many POV files as frames are generated (then requiring a batch rendering in POV-Ray). A time port becomes visible and must be connected to the time port of another module having an effect on the scene.
LowDim_Options

Options for lower-dimensional objects: lines and points. In Open Inventor, they are indeed 1- or 0- dimensional objects in the 3D space, but in a POV-Ray scene all objects are at least 2D, so points are converted to spheres, and lines to cylinders (or cones given what's desired). The size conversion of these objects have these options:
- Faithful: Tries to approximate the size you see on screen in the Open Inventor window, and uses cylinders (and spheres at the corners) to translate the lines. Translated size is dependent on the camera position and the viewer size.
- 1D: If you really want it to look similar to 1D lines, with their thickness independent of the distance from the viewpoint, then the further lines or parts of the lines must always appear the same size. In this case, the cylinders are stretched and shrinked so as to seem the same size no matter the distance from the camera (in the POV-ray file, cones are defined for this purpose). Do not use this option if you have an orthographic camera, it's going to make things look weird.
- Absolute: Sets cylinder (and sphere for corners) size as user-given value.
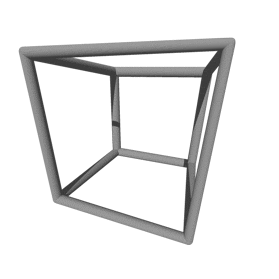
Above is an example of a Cube (line drawstyle), with the 1D option, and a high FOV angle to show the effect. At the start, i.e. at the initial camera point of view (the one that's saved in the POV-Ray file) it looks like all "lines" are the same size. But going around the back you can see the illusion. The lines are actually cones!
LowDim_Sizes

User-given sizes for the Open Inventor points and lines ().
Advanced options

For when you want to modify the POV-Ray files.
- Global finish: Adds to include file a transparency variable T and a macro F() for the finish. Very useful for testing different materials for a very complex object, so instead of modifying the .pov file that can be hundreds of MB is size, just modify the small .inc file.
- No inc: Will not generate the .inc file, nor will it add the #include XXX.inc line in the .pov file.
- Objects: Only writes the objects shown in viewer. No camera, no lighting, no comments, no version number, nothing else! Intended only to be included from a main POV-Ray file. Beware that if you have both the Global finish and No inc options enabled, you'll have to define T and F() yourself. (hehe, F() yourself)
Background

If background was toggled in the previous port, then this is the color to set it to.
Time

If animate was toggled, this is the time port, connected to another time port controlling what you want to animate.
The module takes the time from this step, and renders one file for each time step in the given sub range of the time port.
Directory

The directory in which the files will be created.
Filename

The file name, without the extension. A .pov file and a .inc file are created.
DoIt

Push this button to generate the file.
Commands:
Additional options can be accessed when typing in the console Convert_Scene_To_PovRay COMMAND_NAME.
verbose
Displays information on the conversion. Retype to hide info.
create
Runs the computation.